Apple Baked Ham

This recipe will make your Ham tender, juicy and full of flavor.
Baking your Ham with Apples and Cloves enhances the flavor.
I am definitely a proponent of baking Ham cut side down. It truly does help retain the moisture. Remember this type of Ham is already cooked. The baking process is really just to warm the Ham for serving. Baking it cut side down, prevents the Ham from drying out.
Back in the day, most people would cook their Ham on its side with Pineapple and Cherries attached with toothpicks. Yep, I prepared mine that way too. The Pineapple added flavor but the cut side of the Ham was always overcooked and dry.
So try baking your Ham cut side down, it truly does make a difference especially with this recipe, because your Ham will be sitting on a bed of Apple slices.
APPLE BAKED HAM RECIPE
Ingredients:
- 8 Pound Fully Cooked Bone In Half Ham
- 25-30 Whole Cloves
- 1/2 Cup Maple Syrup
- 2 Tablespoons Honey Dijon Mustard
- 2 Apples, cored and sliced
- 2 Cups Apple Cider

Directions:
1. Preheat the oven to 325 degrees.
2. Score the skin on the Ham in a diamond shape pattern. Insert the Whole Cloves into the skin.
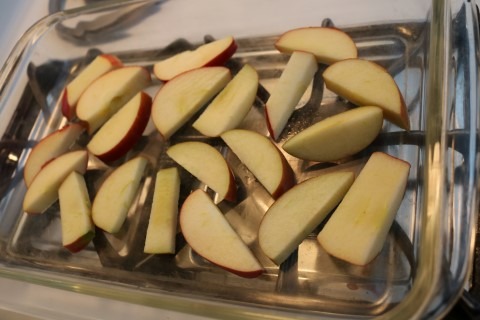
3. Place the Apple Slices in a single layer in a 9 x 13 baking dish or roasting pan. Then set the Ham cut side down on top of the Apple Slices.
4. Whisk together the Syrup and the Mustard in a small bowl.
5. Brush the Syrup mixture over the entire skin on the Ham as you see here.

6. Next add the Apple Cider to the bottom of the pan. A little tip, set the pan on the rack in the oven, then pour the Apple Cider in the bottom of the pan. It helps to prevent spilling the Apple Cider. That would be a mess to clean up in the oven!
7. Place a tent of foil loosely over the top of the Ham. This helps to retain the moisture in the pan, which in turn keeps the Ham moist.
8. Bake the Ham for 1 & 1/2 hours. Look for an internal temperature of about 140 degrees. All ovens cook differently so have a meat thermometer handy and start checking the temperature at about 40 minutes to ensure you are on track with your cooking time. Remember this style of Ham is cooked, so in essence, you are just warming it up and giving it a flavor boost. You don’t want to serve a dry overcooked Ham.
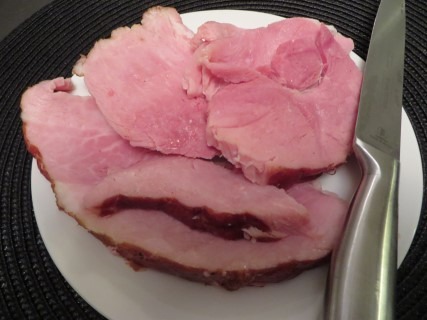
Here is what the finished Ham will look like.

9. Let the Ham rest for 10 minutes before carving. You also may want to remove the Cloves before carving/serving in case your guests or the children forget to do so.
Recipe by: Hot Dish Homemaker


1 Response
[…] years and I was planning on baking a Ham. I thought it would be perfect to go along side my “Apple Baked Ham” so I began figuring out my […]